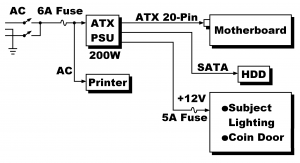
From our service department records: Team Play, Inc. engineers answer your questions about maintenance, service, and business. Includes a block diagram of power wiring.
Observe safety instructions! Before preparing your photo booth for operation, make sure that you read these instructions. The Safety
chapter is a collection of basic safety instructions and related data. Later chapters include further safety messages.
Key to Safety Terms
Term
Meaning
WARNING
Failure to avoid this hazard might cause death or serious injury.
CAUTION
Failure to avoid this hazard might cause personal injury or property damage.
NOTICE
Helpful data about good practice. Doesn’t relate to health.
Safety Instructions for Gen 3 Photo Booths
⚠ WARNING: Disconnect power when servicing. Prevent electrical shocks and equipment
damage.
⚠ WARNING: Connectors. Your photo booth uses keyed connectors that only fit one way. Forcing a connector could cause injury or equipment damage. Be sure that connectors fit together properly.
⚠ WARNING: Cables. With power on, never connect or disconnect photo booth cables or connectors. Otherwise, you might damage the photo booth.
⚠ WARNING: Fuses. Never jumper a fuse. Only replace a fuse with one of the same type, fusing time and current rating. Failure to observe this warning might result in fire or electrical shocks.
⚠ WARNING: Ground connection. The photo booth requires a grounded, three-wire power outlet. Never defeat the ground pin! Ungrounded operation risks electrical shocks and equipment damage.
⚠ WARNING: Mold and Mildew can endanger your health. Mold removal can be hazardous to your health and that of co-workers. Spores can invade the lungs and cause respiratory disease. Removal chemicals contain chlorine bleach, which is toxic. During removal, appropriate protective clothing and strong ventilation to the outdoors is necessary. Only certified mold removal professionals should encapsulate and remove mold or mildew.
⚠ WARNING: LCD. Handle the liquid crystal display with care. Avoid serious injuries from shattered glass.
⚠ WARNING: Transporting. Movers should watch out for one another, avoid injury and be respectful of heavy equipment. Glass and fragile components require special care.
⚠ WARNING: Water. Never allow the photo booth to come into contact with water, sewage or mud. If such contact occurs, drying the machine won’t render the machine safe again. Shut off the machine and service it. Repair or replace the electronics. Lube mechanical joints and moving parts. Disinfect surfaces to protect users from bacterial or mold exposure. Otherwise, death or injury by fire, shock, contamination or illness is likely.
✱ CAUTION: AC Mains Supply Cord. If you have a damaged AC mains detachable supply cord, replace it with a factory approved cord assembly. This cord is available from the manufacturer.
✱ CAUTION: AC Mains Supply Cord. For 230 VAC operation only, use a detachable AC mains supply cord. The cord must comply with the specifications below.
230 VAC Cord
H05VV-F, 3×1.00mm², three-conductor, unshielded, CEE color code; GREEN/YELLOW insulation for earthing conductor
Connector
IEC320-C13 right angle connector
Plug
IEC 884 certified plug compatible with country standards and requirements
✱ CAUTION
Avert accidents and malfunctions! Your installation must be safe and mechanically stable. It must comply with building codes, ordinances and procedures in this manual.
For safety’s sake, turn off any malfunctioning photo booth. Have a qualified technician service the machine. Call your distributor and see if your warranty covers the service fee. Your warranty is in force for one year after your purchase.
✱ CAUTION: ESD. The term ESD stands for electrostatic discharge. Wiring can inductively pick up pulses that may affect machine operation. Both natural and technological sources can produce ESD. ESD effects vary from software disruption to hardware malfunctions, damage or destruction.
✱ CAUTION: Transporting. Before moving or transporting a photo booth, you must perform some minor maintenance steps. Retract the leg levelers toward the cabinet (minimum height). Retraction avoids bent levelers and cabinet damage. Remove the camera topper from the top of the booth. Otherwise, the topper could break off. Also remove the print media from both printer modules. Otherwise, you might damage the media or a printer. When installing the booth at the new location, remember to reinstall the camera topper and media. As necessary, readjust the leg levelers.
✱ CAUTION: Liability. This equipment might be subject to damage from static discharges or power surges. Team Play assumes no liability for equipment damage. We recommend a surge protector.
✱ CAUTION: Hard drive handling. The hard drive is sensitive to mechanical shocks. Gentle handling will reward you with long and reliable operation. Otherwise, a sharp rap to an operating hard drive can destroy it.
✱ CAUTION
Reserved Rights. Team Play reserves the rights to this document. Reproduction requires prior permission from Team Play.
Intellectual property laws protect the photo booth’s hardware, software and content.
Product specifications might change without notice.
✱ CAUTION: The menu, Reset Adjustables to Factory Defaults can reset both coin and operational settings. Take care: There is no “undo” feature.
✱ CAUTION: The Coin Audits menu can reset both coin and operational settings. Take care: There is no “undo” feature.
✱ CAUTION: Flood water can contain minerals that could damage your equipment.
✱ CAUTION: The Audits menu can reset both coin and operational settings. Take care: There is no “undo” feature.
✱ CAUTION: Ventilation. Allow at least two inches of clearance for ventilation between the back of the photo booth and the building wall. Otherwise, the wall will obstruct ventilation fans at the top of the cabinet. The machine might overheat.
✱ CAUTION: When installing panels, avoid pinching wires.
✱ CAUTION: Cleaning. Never use abrasive pads, cloths, or cleaners on photo booth glass or plastic surfaces. Abrasives can scratch photo booth surfaces. You may clean with either a mist of water or a mild glass cleaner. A diluted ammonia formula (such as Windex® cleaner) is okay to use. Spritz the water or cleaner on a cloth, not on the surface that you’re cleaning. Otherwise, the cleaner could drip and damage the electronics. Avoid using soap. Use of abrasives will scratch plastic surfaces. Abrasives can also pit the glass monitor screen.
✱ CAUTION: You are responsible for proper installation, maintenance and operation. Team Play Inc. isn’t accountable for damage resulting from faulty assembly, maintenance or operation.
✱ CAUTION: Software, hardware, and manual changes. This manual, the photo booth, and booth software are subject to change without notice. On the publication date, this manual was accurate. As necessary during development or production, content may undergo revisions.
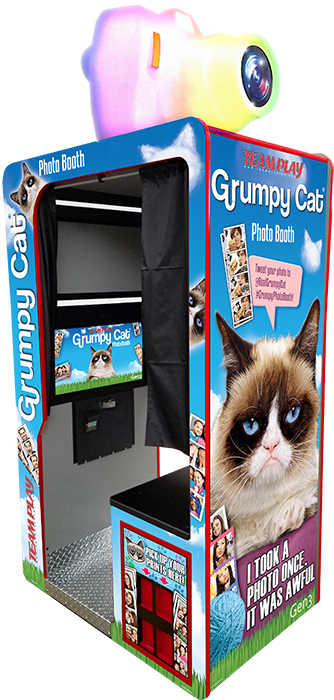
➤ NOTICE: Intellectual Property Licenses for “™” and “Grumpy Cat™”. Grumpy Cat™ Images Copyright and “Grumpy Cat™” Trademark are the exclusive property of Grumpy Cat Limited, Ohio, USA. www.grumpycats.com
➤ NOTICE: Team Play Trademarks. Team Play™ and FunStopPhotos™ are trademarks of Team Play Inc. All rights reserved.
You need media right away! Your booth will arrive without media. (Your Team Play, Inc. media price includes shipment via UPS Ground. For air, two-day delivery, etc., you’ll pay an extra charge.)
✱ CAUTION: MEDIA BRAND. Your photo booth only accepts Team Play (TPI) media. This media is available from TPI, or from your distributor. Accept no substitutes. When you receive your media, check the part number. On authentic TPI media, the part number ends with the letters “TPI.”
✱ CAUTION: GEN 3 ONLY. The Gen 3 printer is a different type than the Gen 2 printer. Your photo booth only accepts Gen 3 media. Don’t attempt to substitute Gen 2 media (or any other media).
✱ CAUTION. DON’T USE OLD PAPER WITH NEW FILM. When your film runs out, you’ll always have a little extra paper. On each media paper roll, the manufacturer purposely includes extra vends. This practice makes the prospect of wasted film unlikely. Every time you change the film, discard the extra paper. Start with a fresh batch of paper. Otherwise, you could run out of paper in the middle of a roll of film.
➤ NOTICE: SERVICE DESK. The Team Play, Inc. service desk is open between 6 AM & 5 PM, Central Time (847) 952-7533. Email us anytime: service [-AT-] teamplayinc [-DOT-] com
➤ NOTICE: PART LOCATIONS. The photo booth ships with the film tray and empty spindles in the printer. The power cord and keys are in a cardboard box in the booth’s seating area. The white camera topper is also in the booth seating area.
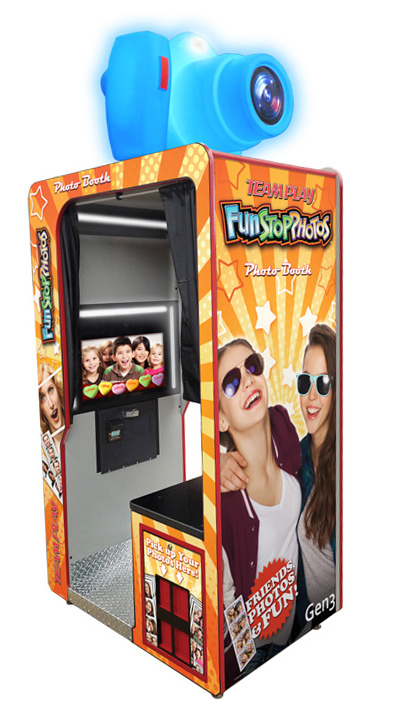
Unpack Your Photo Booth
This is a job for two people.
The photo booth arrives on a pallet. Bands secure the booth to the pallet. The bands pass through the seating area. Cut the bands.
On the bottom of the cabinet are a pair of shipping cleats. Don’t remove these cleats, as they’re permanent.
The white camera topper is inside the booth. Remove it. Also remove the box with the power cord and keys.
While standing beside the skid, rock the booth toward you. Eventually, the cabinet will slide off one end of the skid.
One side of the cabinet will contact the floor. Tilt the cabinet toward you as your partner removes the skid. The cabinet has leg levelers and wheels. After it’s off the skid, the cabinet will roll around freely.
Roll the cabinet near its operating location.
Precautions
⚠ WARNING: Indoor only. This photo booth is only for indoor use. Operation in damp or exposed areas is hazardous to players. Moisture and outdoor weather will damage the electronics and cabinet.
✱ CAUTION: AC Cord. If you have a damaged, detachable AC mains cord, replace it with a factory approved cord assembly. This cord is available from the manufacturer.
✱ CAUTION: Codes. Confirm that the installation and wiring comply with
applicable codes and requirements.
✱ CAUTION: Service. Refer service to qualified service personnel.
You’ll Need These Tools
To install camera topper to wood mounting panel
7⁄16” socket with ratchet
7⁄16” end wrench
To install camera topper with wood panel to cabinet
7⁄16” socket with ratchet
Step ladder
To install leg levelers
5⁄8” end wrench or adjustable wrench
Install the Photo Booth
Move the photo booth to its operating location.
Connect the photo booth to a properly grounded power outlet.
The AC mains cord is in the parts box. Attach the female end of the AC mains cord to the IEC power connector. The power connector is on the cabinet rear.
Connect the male end to the power outlet.
Confirm that nothing is pinching the cords and cables.
Place the cabinet in its final position.
Confirm that nothing is blocking ventilation openings.
Adjust the four cabinet leg levelers downward. The cabinet must be level, and must not move or rock.
Confirm that the cabinet wheels are above the floor and not supporting the cabinet.
Install the Topper
Set up a step ladder so that you can access the top of the photo booth.
From the top of the cabinet, unbolt and remove the topper mounting plate. (This is a square, wooden plate with a rectangular, plastic shipping panel in its center.)
At ground level: Unbolt the plastic shipping panel, but save the 1⁄4-20 mounting hardware.
Discard the plastic shipping panel.
With the topper upside-down, set the mounting plate over the open end of the topper.
Run the two cables from inside the camera through the topper opening, and through the mounting plate. (These cables have black and yellow wires. The two-pin connector powers the RGB LEDs. The four-pin connector powers the strobe.)
For this step, reuse bolts, washers and nuts that you saved when removing the panel. Bolt the mounting plate to the camera. (Both panel sides are the same. Neither side must face “up.”)
Position the camera topper and panel atop the photo booth. Mounting holes allow you to face the topper in any direction: North, east, west, or south.
Connect the two topper cables to Molex® connectors inside the booth roof.
With four 1⁄4-20 bolts, fasten the topper plate to the cabinet.
Turn on the cabinet power switch.
Install Paper in the Printers
Unlock, open and remove the printer access door. (Keys are in an envelope inside the part box.)
Confirm that the cabinet connects to the AC power outlet.
To load paper into the printer: Turn on the photo booth.
On the front of the printer door, press the OPEN button. Now you can slide open the printer tray to access the film and ribbon cartridge.
For media loading instructions, refer to this YouTube video:
For preventive maintenance instructions, refer to this YouTube video:
The photo booth doesn’t ship with a credit card reader.
The reader is bad.
The reader is offline.
The reader can’t communicate with the network.
The net (local internet or built-in cellular) is down.
Q2: Why are the pictures blurry?
The user moved while taking pictures. (Most typical)
Poor lighting. Inside the machine, the lights came unplugged.
The lamps may be defective. (If they’re out, the camera will attempt to compensate by lengthening its shutter time. But a long shutter speed would tend to blur the image. Due to poor lighting conditions, the lens aperture might also open wide. In that case, the depth of field would narrow. Part of the user’s image would then likely be out of focus.)
Q3: My photo booth won’t boot. How should I troubleshoot that problem?
Spend a minuteand go over the basics…
Unplug the booth.
At the outlet, check for AC power voltage.
Plug in the booth.
Turn on the booth.
Check for a blown fuse.
If the fuse is open, replace it with a fuse of the correct rating: 6.3 A / slow blow / 250 VAC / 5 x 20 mm
Q4: What do the green and red screens mean?
Have a green screen? Great! All systems check okay.
Have a red screen?Check problem areas in this order…
If the screen reads “Invalid Hard Drive,” you have unauthorized booth software.
Printer: Verify that both printers are on.
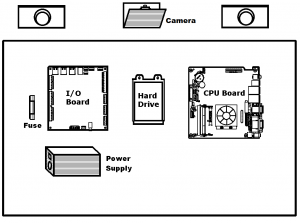
Camera: Verify that the camera USB cable connects to the CPU Board.
I/O: These LED indications signal “normal operation”…
Three green LED indicators near the four-pin power connector: ALWAYS ON.
One green LED indicator near the USB connector: FLASHING.
One green LED indicator near the center of the board: ALWAYS ON.
Q5: The booth’s giving me a red screen, and the printer’s displaying error messages.
You can’t fix such problems by adjusting the booth software. The printer requires hardware maintenance.
You might have a cleaning problem. During every collection, clean up the paper shards! Otherwise, they’ll jam the printer.
Why you need to clean up the shards during collections: Ideally, the plastic catch bin holds one roll’s worth of paper shards. Yet the bin really only stores shards from about half a roll. This is so, because the paper packs loosely.
For help in solving the problem, contact Team Play.
• Maintenance Questions
Q6: What should I use to clean the touchscreen?
Clean the touchscreen with your choice…
• Soap &
water
◾ Non-caustic
cleaner
◾ Windex® glass
cleaner
Q7: My DBV is having trouble reading bills. How should I clean it?
Take the back off the reader.
Take the bottom off the reader.
You might have a jammed bill path.
Remove the cassette.
Squeeze the thumb locks.
Clean the bill path.
Use soap and water to clean off soda pop.
Clean the lens under the mechanism.
Q8: What maintenance should I perform during collections?
Clean the touchscreen.
Collect and discard the media shards. Empty them out.
Clean the camera window.
Make sure that the lights work.
Make sure that the bill acceptor works.
• Software Questions
Q9: I put money in, but nothing happens.
Check: Does the bill validator (DBV) work? Run the booth’s onboard diagnostics: See if the booth recognizes dollars.
While you’re in Diagnostic Mode, check Price per Play.
If a vend costs $3, but the customer inserts $1, of course nothing happens.
Hint: Software adjustments (configuration settings) might be incorrect: The pricing is wrong, or you have the wrong value for the bill setting. For example: You charge a dollar per vend. The DBV produces one pulse per bill. But unfortunately, the booth evaluates that one pulse as only equal to a quarter!
Q10: Why can’t my customers go online?
The booth doesn’t support cellular connectivity, such as ATT or T-Mobile
hotspots. (If you use the right USB Wi-Fi adapter, the booth supports Wi-Fi.
Through the booth’s RJ45 port, you can also connect the booth to a regular
hardware Ethernet.)
The booth doesn’t support Internet connections that require
a login.
For example, at a well-known coffee chain, this phrase appears:
“Do you accept the terms and conditions?” In this case, accepting logs in the user.
Again, the connection must not require a login. The photo booth has no browser. Without one, the user can’t click ACCEPT.
Your network might be faulty. Check it out.
Nobody registered this booth to upload to the cloud.
• Trade & Business Questions
Q11: How long will my Team Play media last?
800 Vends. One Team Play media shipment includes two rolls of film and two rolls of Team Play media paper. Each roll of film allows 400 vends, or 800 vends for both rolls.
Q12: How long is my factory warranty?
One year. As a photo booth owner, you receive a warranty on the printer and electronics. Our Team Play, Inc. warranty lasts for one year from the date of booth shipment.
Q13: Why must I register for uploads to the Team Play, Inc. cloud?
The upload link connects to a page that allows direct sharing to social Team Play media. The link page offers three advantages…
Customers can download photos to their phones or computers.
Customers can directly post photos to social Team Play media accounts, such as Facebook, Twitter, Instagram, etc.
When you register, your customers can park their photos on the cloud for 30 days.
Q14: Is there a cloud use fee?
No. Your Team Play media purchase includes cloud use.
Data Organization. We’ve organized each component alphabetically by a descriptive noun in the name. For example…
Camera, 5 megapixel
Drive, disk, 2.5-inch, SATA
The part number by which you can order the part is on the right side of the page.
Use the part description to find the part number. The number allows you to order the part. Yet some parts are unavailable through your distributor. For example, common screws and nuts that you’d find at hardware stores.
• Boards, Circuit
Board, I/O
A-A-SEL-0004-07
Memory, 2-gigabyte, DDR3-1666, SO-DIMM
G-A-SEL-0002-00
Motherboard with APU
F-A-SEL-0021-00
• Consumables
Media, Team Play, 4 x 6″; for Mitsubishi CP-D707DW-S printer (800 prints)